Wednesday 16 May 2018

Transitions: Final Cut

Transitions: Final Cut


I present the final cut for our transition project, Black Mirror.

Tuesday 15 May 2018

Transition: Evaluation

Transition: Evaluation

This project was a new challenge for me and really helped me focus on my prefered role as an editor. I learned plenty from this unit, I got to learn some new skills and brush up on ones I haven't used in a while.

The pre-production stage went relatively smoothly. Going in to this project I was confident and pleased with the amount of room I had to adapt the source material as an editor. Even though we changed our idea, we were still able to get locations, casting, and a shot list sorted in time (although perhaps later than was prefered). 

I watched the original episode and sequence countless times in preparation for this edit, which really helped me to pick out the finite details that I wouldn't have otherwise noticed. 

Our team working skills were effective and we were able to communicate effectively to prepare shot lists, graphics, costume and set design all in a short space of time.

We had access to some great looking locations that couldn't have been much better really. The locations were a fun challenge to shoot and even more fun to edit around. I found myslef exploring reverse shots and different close ups that I wouldn't have considered incorporating before now.

In the lead up to the shoot day we did perform a couple of test shoots. However looking back now I really think we needed to do more, especially with the more technical aspects like the Tv graphics and the drone. Since on locations and in the edit they proved to be some of the weaker and more difficult elements to get right. Having all those extras on set made for really visually effective shots, but also made life much more difficult, since we had to block through the scenes with each and every one of them which took a lot of time since they were so distracted by the equipment we had.

Unfortunately due to the very tight turn around on this unit it would have been difficult to fit futher test shoots in especially since we changed our idea. 

Focussing specifically on my role as the editor I am very happy with the output we produced. I believe I had a valuable input in this project. The use of graphics and sound design really helped me improve my already established skills.

Sound design in particular was one of the strongest elements of this project. I took on feedback very well acting on all the changes O could. 

My extensive note taking on set and key research in to the Black Mirror genre and edit style allowed for a smooth and reasonably quick edit. I was very organised during the post production, having many of the visual or sound elements I wanted, either pre prepared, or at the very least planned out. 

Colour grading for this project also went very well. It is something I have touched on in the past but never focussed on to this extent. I worked very closely and effectively with the DOP applying my knowledge of colour theory to help enhance the eery on edge atmosphere that the audience can immerse themselves in. For this sequence, I also recorded foley sound and was able to play with a lot of levels, shot sizes/durations to make a nicely paced realistic seamless sequence.

If I had more time I would have liked to record a little more foley to help enhance some of the quieter shots. I spent a lot of time on the last few shots trying to get their pacing to match while looking realistic. I utilised slowmo and other effects which vastly improved the ending. However, if we had more time I would have liked to work on it more, maybe even re-shoot parts to eliminate some of the minor continuity errors that I was unable to correct.

But overall I think I produced a very effective edit and despite minor creative differences at times, I worked well with my group to produce a great looking piece of work and focus myself down on to one production role. 

Transition: Edit Process 2 (Colour Grading And Graphics)

Transition: Edit Process 2 (Colour Grading And Graphics)

The second part of my editing process for this project involved the use of colour grading for a professional looking finish as well as employing graphics to enhance the visual effect of the project.

I had actually prepared these graphics earlier on in the project so that they could be used on location during our shoot. I wanted to create a similar looking graphic to the original but adapting it slightly to give my own input/spin. 


To create the graphic I started the process in photoshop, piecing together the design using various shapes. Exporting multiple versions (some with backgrounds some without) allowing me choice in the edit. Then I moved this design in to after effects. Here I was able to duplicate the layer in order to separate the different colour filters that go into making that particular shade of white. This separation made the glitch effect more visually interesting and appear like an old VCR tape. I then added multiple distortion layers which allowed me to adjust the static effect of the glitch. Rather than keeping it on a loop I thought it would be more effective to have the video distort at different levels, speeds durations etc. at different points. So I adjusted each slider until it reached a point I was happy with. Once this was done I could export it into premier or wherever it was needed. 

This eventually led to the creation of an entire glitch sequence at the opening of the film. To polish the edit I prepared multiple versions of this sequence. It incorporated multiple distorted clips from different points of our sequence. But after showing it to George he explained that they needed to be more blown out and less recognisable. I achieved through upping the scale, increasing the speed of the clips and going one step further, lowering the exposure to create a very creepy off-putting sequence.

For the second half of my edit process, heading towards the final cut I was mostly polishing, making the few changes that Simon and George suggested. I had to borrow/copy some audio from other clips to use on clips that didn't have any sound. I found myself using a lot of minor adjustments e.g. levels/gain/constant powers,
as well as layering and fading to ensure every single clips audio, flowed gently in to the next one to maintain the immersion in the atmosphere.

I had also recorded some foley sound for a few shots and had to match up the timing if this so that it seemed natural. This also helped act on Simons recommendation of adding to the sound design. I had a ticking clock for a few shots to add to the atmos.  


As we began to polish the edit, I sat with Drey (our DOP) to work on the colour grading. I had done a lot of research in to grading and colour symbolism in thriller/Sci-Fi. I was eager to see how we could improve the look of the sequence (since Simon said grading would help it look even more professional). We went through a few different pre-sets to
experiment with the visuals. We wanted something that brought down the popping and exposure of some of the brighter colours in our sequence (e.g. the greens and reds) without it looking washed out. After some tinkering we found a good basis for the grade, however, we wanted to enhance it even further.


In order to do this in the most effective way possible, I employed the use of adjustment layers. This meant I could apply a general look for the whole film and any shots that didn't match could be adjusted individually. 


We fiddled around a lot with the midtones of each clip to help bring out some of the blues. This was also helped a lot by the temperature dial. I would move the tint bit by bit until it reached a stage I was happy with, I would then check with Drey to get her feedback, or recommendation as to what needed to be changed. Usually, i'm not a huge fan of colour correcting but having Drey there helped make the process more painless and we got more effective results. 

After showing this latest cut to both George and Simon there were only a few changes that they wanted. With a new pair of eyes on the film certain aspects were pointed out that I hadn't picked up on before.

The drone shot at the end was one George and I had a lot of trouble with. Initially, I had sped it up to try and improve its effectiveness, however, after showing it to Simon he suggested we consider lowering the speed instead. After a lot of experimenting, we all agreed that the most effective path forward was to incorporate the use of slow motion (thanks to our decision to record in 60fps this was an effective look). However it needed to be justified and not gimicy, so I used rhythmic editing to tie it in with the music. The changing pace of the music was matched by the change in visual pace. This took a very long time to perfect however and involved a lot of single frame adjustments. 

Overall though I wasn't overly happy with the pacing of the shot and the way it tied in with its previous linking shots. It had improved vastly from what it was and we simply didn't have the time to mess with it further. 

Apart from a few minor audio tweaks the only other thing we wanted to change was the colour grade. After taking a second look
we decided it looked far too Blue. While a blue filter can look nice, it has too much symbolic association with calmness. This is the exact opposite of the atmosphere we have built up. To resolve this we went in a slightly different direction and chose to incorporate more of my second choice of colour (orange). By raising the temperature in each shot we were able to build up far more angst. The risk with this was we would have a lot of blown out exterior shots, but by adjusting the exposure slider for each shot we overcame this problem. I then watched back the edit on a bigger screen to ensure the grading was consistent, especially during the transition from interior to exterior lighting. 

Once this was all tied together I had a very polished and effective final cut completed.

Monday 14 May 2018

Transition: Website

Transition: Website

As part of my ongoing research and development for this unit, I worked with my group to develop a website to feature our project and creative methodology, you can check it out at the below link.

Friday 11 May 2018

Transition: Edit Process And Rough Cut

Transition: Edit Process And Rough Cut

Over the last two days, I have been working on a rough edit for the project to prepare an initial cut that my director and Simon can review. 


The first steps was to arrange all the footage in to bins, since through my research I found this is one of the best ways to stay organised. On the shoot, I made notes as to which shots were the most effective which saved me time reviewing all the clips. I also had previously made a playlist of all the sound effects that I wanted to use in the edit. I Downloaded each of them and placed them in a separate bin. 

Once I had chosen and organised my clips the next step was to place them roughly in order in my timeline so that the story in a basic form was there. This was a great way to start as it allowed me to see which shots fitted together, which ones needed to be changed and which cuts need a bridge. 

For example there were a few shot changes that featured minor continuity errors, such as the character starting a shot in a slightly different place than they finished in the previous shot. To solve this I would cut in on the following shot and make it a mid shot. Or I would find a different wide or close up to act as a bridge hiding the change.


I had George Lock (our director) sitting with me for the edit. This was helpful because there was a second pair of eyes when I needed it, making sure shots matched up nicely and he was able to pick up on continuity errors or other details that I might have missed. George's passion and experience was a good energy to have, however, I did get the feeling that he wanted to take over at times and I felt a little bit like my space and creative control was slightly invaded. 

But after expressing this to him, I found he was a lot more respectful of my space and ability as an editor. Similarly to the shooting days I split the editing in to two distinct halves. I spent my first-day focussing on all the interior scenes with George.

The second day of editing was dedicated to the second half of the sequence (all the outside scenes). George had given me my space today but having worked with him yesterday I confidently recognised the style and creative vision he was after. Even when George wasn't with me I still had my notes and the shot list to work from. This came in very handy if I was unsure where to go next. I was able to fully piece together the second half of the sequence, making sure it flowed the same as the first, with similar pacing and linking shots. 

Once this was done I watched back the edit from the beginning to make sure it all flowed nicely and followed the same pacing. I had to make a few tweaks to the shots I used since upon reflection some didn't work and needed to be replaced with ones we were previously unsure about.

My next step once the basic visuals were sorted was to attend to the sound design. Going in to this project I had a lot in mind for the sound design. I had each effect I wanted, prepared in a bin and from there it was a case of experimenting/testing to see which ones worked where. In order to create effective atmos, I placed the high pitched ear ringing sound right at the start of the sequence. This works to disorientate the audience right from the beginning. This sound had to continue all the way through to the second scene, but I had to bring the levels down when the protagonist turns of the TV (since i want to instil the idea that most of the sound is coming from the TV). In general as well listening to it out loud I had to bring the overall levels of the background noise down to avoid peaking.

The next effects helped to build and enhance/maintain the ominous atmosphere. I implemented a series of low-frequency drone sounds that vary in intensity depending on the on screen events. Making sure the tension and alertness of the audience is brought up at the right points. To match the glitch effect on the TV I laced appropriate glitching sound effects under the other audio which only occurs when a glitch is visually seen on TV.

Progressing through the scene we found that some shots were too quiet and we loose some of the atmosphere that we built up. To solve this I found some basic creepy tones and rumbles which I kept relatively quiet and placed under all the other tracks. This way they could fill the scenes that have less sound design, acting as background noise that doesn't distract from the visuals. 

As well as adjusting the cropping and image scales, in some cases (especially during the chase scene) I had to adjust the speed of some shots to ensure their pacing matched with the previous shots and didn't look too jumpy or out of place. 

These factors all came together niceley to produce my rough cut which you can see bellow.


Our feedback from Simon was mostly positive. Our shots and pacing all linked nicely, and our stylistic decision to incorporate mostly static or tracked shots was clear and effective. He liked the sound design and the choice of shots which I was pleased with.

His main points of improvement were: 
-To take the sound design even further, since some shots are still very quiet even with the atmos and they need a little extra something.

-Make sure that if there is movement towards the end of a shot, we don't lose it as we cut. The shot transition should take place just before the movement cuts off, ensuring the pacing is not juddery.

-Some parts of the sequence needed a few shots needed to be flipped to ensure the eye lines between characters match. Also some parts of the sequence needed to have shots chopped or changed to enhance the story telling, for example he wanted to see more of the two shot when the protagonist looks up at the window.

All of this is achievable and will be worked on for my next cut.

Friday 4 May 2018

Transition: Shoot Days

Transition: Shoot Days

Even though my primary role for this project was as the editor it was still important that I was present for the shoot days, as seeing the sequence unfold in front of me and being able to interject my opinion will help me to create a more effective edit. 


Day 1
We arrived at the shooting location nice and early to make sure all the equipment was set up and we could have time to introduce ourselves to the actress and run things through with her, without cutting in to shooting time. 

Things got off to a great start as Claudia (our actress) was really nice, and great at following direction. We had the shot list to work from and make sure the sequence went in order and all key shots were obtained.

George had decided to shoot the scene in chronological order as it made things easier. Since it meant we could start upstairs where we need the most lighting with full batteries and the equipment was also set up in there anyway (saving us time carrying it all up two flights of stairs). It would also save me a little bit of time in the edit since I don't have to hunt for clips as much. 

Having a copy of the shot list allowed me to make useful notes (especially if we picked up additional shots that weren't listed).

Throughout the day I was helping set up each scene with the track, planning the lighting etc. But my main responsibilities were to review the shots with George and Drey to see how they looked on screen/camera.

When we had a break in shooting I would pull all the clips on to my laptop to review them and see how they looked, and if any needed to be re-shot.

Throughout the day I was also keeping regular
concise notes about how many takes we would do for each scene and which were the most effective. This will save me a lot of time in the edit, as I'll already know which shots to include.

The shoot went very smoothly, we had a little trouble with the stairs shot as it involved a very steep angle change, and the camera refresh rate matched one if the TV's causing visual issues. I helped Drey hunt through the camera settings to adjust and resolve these issues.

Although this put us slightly behind schedule we still wrapped having obtained all the shots we planned.

Day 2
On the second day of shooting, I continued to assist in setting up scenes and reviewing footage.


I had my notes prepared from last time and continued to work on them as we progressed through the shoot. 

Today I also found myslef checking the camera settings to make sure they were the same as last time (frame rate, resolution etc) so that i could confirm this would all match up in my edit. 

For this shoot day we also had the use of my drone. Since I had flown it in all the test shoots I took the lead on flying it for this
day. In heignseight we should have done a practice run through in the morning as getting the right pacing and angel with the drone took a lot longer than we thought. The active tracking messed with the camera too much so it had to be flown manually. But we also had to fly it from a place with a restricted view to avoid getting in shot, making things difficult. Eventually however with assistance from George we got the shot.


At the midway point of the day I reviewed each clip on my laptop while George and Drey went to pickup a prop. When they came back I was able to point out which shots needed to be re-done and how the sequence could piece together. 

I also made it my responsibility to make sure we got an appropriate amount of foley sound, however looking back I would have liked to have gotten more.

Continuing with my note taking in to the afternoon I also worked with Drey to get a decent angle outside where the lighting made things difficult to judge. 

The end of the day involved organising a lot of extras that we had arranged to be there, and blocking them around Claudia, as well as getting them to match the pace of the drone. Needless to say doing all this while George acted as a character (as the contributor dropped out last minute) and I flew the drone was incredibly difficult. But with help from Drey we just about acheived the shot we wanted before we had to wrap up.

Overall despite being less active on shoot than I am used to, I made the most of my time with note taking, shot framing, footage revewing etc. All of which will save me time in the edit and I proved myself effective in my role and as a team member.

Thursday 3 May 2018

Transition: Test Shoot

Transition: Test Shoot

After scouting our location a few days prior, today we collected our equipment and went to set it up on location. This would save us time setting up on our shoot day and gave us the opportunity to do a few test shots and block out scenes to see how the would look on camera. Helping us plan and block our actual shoot.


Testing Shots 
Using the track and dolly we were able to see how much freedom of movement we had with the camera, and how quickly we could react to changes in movement. 

We were able to see what the rooms looked like on camera, especially in terms of lighting and white balance. Even though there was low light we found that with the help of LED's we could cut in very close without losing quality. 

We used this as an opportunity to see how we needed to dress the set to avoid a distracting background, removing posters childish items, and opening the blinds slightly for more eery lighting. All of this puts us in the right frame of mind for our shoot and will save us time later down the line.


Blocking
Using me as a stand in George and Drey were able to block out the scene. They figured out how they could work with the space in the room and the low ceiling. They could also block the scene using the dolly to ensure that our actress didn't walk out of frame and that they could track her standing up at a steady pace.

We worked out how fast/slow the pacing needed to be, setting us up for tomorrow. We also could see how well the subject stayed in focus as they moved towards the camera.

Drone
In the back garden of our shooting location, I took the opportunity to test out the drone. I wanted to see how steady the shots would look even in poor conditions. This also gave me a chance to practice flying it within the space I had available and whether or not the active tracking software would work.

The results of our test shoot can be seen above/bellow.


Transition: Location Scouting (New)

Transition: Location Scouting

In preparation for our new idea for our transition production, my group and I sat down today to plan out what kind of location we wanted for our film. We wanted to put our own creative spin in the adaptation, as such we thought it would be a good idea to generate new meaning/mystery by having the shoot take place in a slightly higher class of location. This gave us more to work with visually and new challenges for the cinematography. So that afternoon we headed out today to scout our planned shooting locations.


The location we are using is the house belonging to George's relative, who has given us her permission to film there. 

We started in the top room. This has a lot of dark corners and has one big pair of blinds, allowing for eery lighting and a contained atmosphere. But at the same time it is big enough to allow for a track and dolly.

The stairs are one of the most challenging locations due to the lack of space for cameras to be placed. However, it could make for some nice low angle shots. And it would help the story telling if we could film our actress coming down the stairs.


The hallway allows for some great tracking shots on different levels and we can get some really smooth pans. The only issue here is the changing light levels. We would need to make sure the shot didn't become overexposed and that the camera isproperly white balanced. 


There is some room for additional lighting but not a lot.
Moving in to the kitchen this is near perfect. The open plan makes for good tracking shots and reverse shots. We can play around with the pacing in this room and the large windows mean we have to rely less on artificial light. There is also a big TV we can use as a focal point.

The outside area has more space than I was expecting and will mean we can get a mixture of close up and wide angles. As well as switching between shots and reverse shots. I do wonder if we will be slightly restricted by window reflections and the small ally, but we won't know until we shoot.


The steps can make a fantastic transition for use with both static and drone shots. The lane its self is spacious apart from a few low hanging branches that we will have to work around. Overall this is a great location that offers a lot of opportunities for camera angles and set design.

Wednesday 2 May 2018

Transition: Graphics

Transition: Graphics


For our upcoming shoot re-creating Black Mirror I wanted to make sure we have the most effective atmosphere possible. As such, I took inspiration from the original episode and prepared my own glitching graphic effect that can be displayed on a TV on the day of shooting. This graphic will also feature in my edit. It is in the same style as the original but features my own interpretation/adaptation. I created it using after effects and will write a post about the creation process at a future date. 

Transition: Colour Research

Transition: Colour Research

For my role as editor in this unit I want to do some colour grading for my sequence. In order to make the grade as effective as it can be I have researched in to the various colours and their meanings so that I can make the best decision possible about which colours to use in my grade. 

Red
Red can symbolise power, energy and passion. But also anger and danger. It is good for scenes which have a lot of on-screen action and can be used to symbolise a breakthrough or change in a characters mental state. None of this really applies to my scene so i dont think i'll be using it.

Blue
Blue can have a bit of a double meaning. Sometimes it can symbolise trust and stability. Whilst at other times it can be used to express a break down in a characters mental state. Showing how they have fallen in do a station of te of sadness or desperation. Being a darker colour it is also great for creating a sense of mystery. As such it could be a useful colour to use for grading.

Yellow
Yellow is a very stimulating colour it can be used to bring up the energy in a sequence as well as increase the attention of the audience. Being a traditionally happy colour it can lighten the mood of a scene. I will consider its use in my edit. 

Green
Green symbolises nature, as such it brings a sense of harmony to a piece. It creates a feel of calm, and has mostly positive connotations, but can also be associated with greed. 

Purple
Purple connotes wealth, extravagance and power. Purple is associated with wisdom and royalty but can also be used to create a sense of mystery. 

Orange
Orange can represent curiosity and can raise the intensity of an otherwise flat scene, without overpowering it like red. A such it could be a great colour to use in my edit.

Tuesday 1 May 2018

Transition: Contextual Role Research How To Edit Sci-fi/Thriller

Transition: Contextual Role Research How To Edit Sci-fi/Thriller

For the transition unit my group has elected to re-create an episode of Black Mirror. Now since this show crosses in to both the Sci-fi and the Thriller genres it is imperative that I know how to edit for both.

I will be going over my research findings about the rules of editing these two genres, using the show Orphan Black as my source material for this blog post. 

Orphan Black is a show that ran for five seasons and crossed into both the sci-fi and thriller genres during its run. It utilised tension, as well as action sequences to keep the audience on the edge of their seat. Its character-focused narrative made for intense shooting and editing. 

Image result for orphan black

Pacing
When editing any genre it is important to make sure the pacing is appropriate for the film. Film academy online says that the pacing for a thriller needs to be fast at times and slow at others to make sure that tension is built properly.

Image result for orphan blackLooking at Orphan Black we can see that in scenes of mystery or on a lead up to an action sequence, many shots are long and drawn out, however, once the tension is cut you could switch between a series of quick cuts, or stick to one wide master shot (which I plan to use in my project). This ensures the audience are able to to take in as much scene and background detail as possible while still following the action.


Visuals
Image result for orphan black
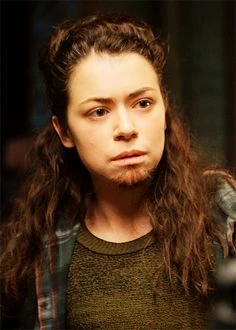
Orphan Black is a big fan of close up's and low angle shots, and if your editing a thriller or a sci-fi you need a lot of close up shots. Not just of characters either, it is key to make sure your scene puts emphasis on the objects characters interact with (especially within the scifi genre) so that the story flows nicely. Orphan Black does this often when a character uses a gun, we would get a close up from the front of the gun making us as the audience feel victimised and powerless (with the use of low angle shots). That kind of reaction is what I want to get from the use of a gun in our project and I have planned a series of close ups to try and replicate this. 
Image result for orphan black

Sci-fi in particular always has a certain look to it. The editor working in this genre would apply filters that make certain colour tones stronger than others. In the case of Orphan Black, they bring out the white's in their sequences to generate a subtle atmosphere and symbolic meaning. 

Sci-Fi is also well known for its light blue tones and high exposures that tend to generate a false sense of calm, this is why I want to bring out the blue's in my project when I colour grade in the edit. 

Music And Sound
The thriller genre is one that heavily relies upon its sound design. Music, atmos, foley and dialogue all come together to create this wholesome and immersive atmosphere that generate an emotional response from an audience. Thriller is well known for its high-intensity music at moments of panic, usually with a long build-up that drops in to a fast-paced track that the visuals can match with a series of quick cuts.

Image result for orphan black

When watching Orphan Black it combines atmos and foley along with the music which commands and steers the reaction of the audience. There is a scene in Orphan Black where one of the heroins of teh story is in a life or death situation. The scene starts off very slow mainly using its dialouge to control the pacing, then as she starts to panic, atmos sound is brought in before we reach the climax at which background music is faded up and acompanied by the loud firing foley sounds of the guns. This gradual build in tension is somehting I hope to try in this project.

Transition: Role Research Ben Yeates

Transition: Role Research Ben Yeats

Photo of Ben Yeates

In order to learn more about my role as an editor and how I can push myself to get the best results for this project, I am going to be looking at the work of a well-established industry editor; Namely Ben Yeates. 

Ben Yeates is a TV editor who has been working in the industry for a number of years. During this time she has worked on a variety of different TV shows and genres, including 3 episodes of Black Mirror. 

I will be analysing some of her work to find patterns, styles and creative methodologies that I can pick up on.

Story Telling
Yeates follows relatively traditional methods of story telling in her work. Sequencing shots in order and ensures that the speaking character is always in frame. However, they certainly have their own unique style. For a start when multiple characters are on screen but only one is talking Yeates tends to prefer two shots over close up's so that more of the scenes visuals can be taken in.

Secondly, they tend to change and switch up their angles on a regular basis. Even during the same line of dialogue, they will switch to a different two shot or a reverse shot. This is used to keep the energy high even during dialogue-heavy scenes, and is something I can incorporate in to my editing. 
Related image
Yeates also utilizes a lot of reaction shots. Whereas most editors would follow the characters eye line to bring whatever they are looking at in to view, Yeates likes to linger on the characters face to bring out their emotional response, establishing e deeper link between the character and the audience. With the pacing of our scene, I hope to be able to draw on the same effect to draw out the tension faced by our central character. 

Interestingly as well Yates likes to include shots where the characters are not in the centre of the frame, despite this she sticks to the rule of thirds and this tendency helps to keep the audience on edge during moments of tension.

Visual FX
Something that is evident in a lot of Yeates work, especially across the episodes of Black Mirror she has worked on, is that she likes to keep the look of the film relatively plain and simple. Rather than go overboard with corrections or enhancements she tends to make simple changes. For example in the Black Mirror episodes she has edited, she keeps careful control over the exposure and light. Dimly lit scenes still allow for skin tones to stand out, and even in well-lit scenes, Yeates will bring down the exposure and contrast just a little to create a kind of dreamy look across the sequence.

Image result for humans tv show
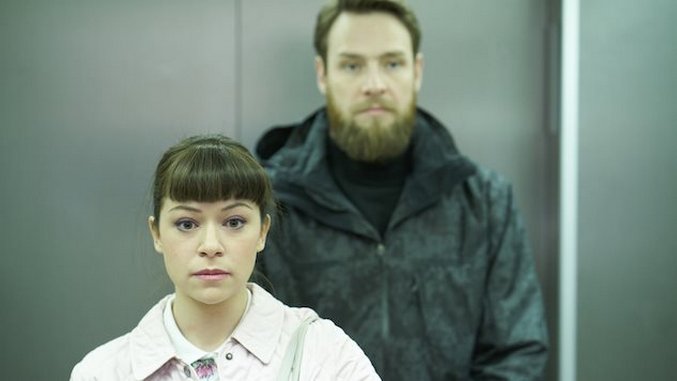
Her use of colour grading is simple yet effective. It is clear that she likes to give her films a realistic feel without the being too gritty. The filters she utilises tend to bring out the skin tones of characters nicely but then washes out a lot of the background colour to ensure our attention is focussed in the right place. This is something i'd love to be able to achieve with my film. 

Genre Work
Yeates has an extensive background in the drama genre. Which means her edits do tend to follow a certain pace. She likes to keep a scene flowing at a pace that matches the dialogue, this can be clearly seen in her work on the show "Humans", where even though she may stick to "two shots" she will change the camera angle on a regular basis to keep up a pace. Our scene is quite long and drawn out with little dialogue as such, I will need to make sure my edit is appropriate for that pace.
Image result for humans tv show
Analysing her work on drama's like casualty or even black mirror, she likes to have a certain level of sound design without necessarily including music.
In fact if you look at her Black Mirror episodes there is very little in the way of music at all. Since she doesn't have to rely on rhythmic editing she is able to play around more with the visuals to show off unique angles. Referring to casualty we can see that background music plays a very minor role, if it has one at all. Instead we rely on the other elements of sound design that generate realistic sounding background noise that enhances our immersion.
Image result for casualty tv show
I hope to be able to take this on board to find sounds that enhance the viewing experience, but still fit and don't detract from the visuals. This way I can follow Yeates example and edit the audio round the visuals, rather than the other way around. 

This can still be done to create tension, make changes to the pacing or like I have noticed with some of Yeates work (especially on shows like "Humans") create a story that feels like it is always moving fowards even if it is not. 


Image result for black mirror be right backCompare this to her work on a few of the documentaries shes helped create and you can see that a completely different discipline in relation to what shots or cut aways should be put on screen. Her documentary work feature colour grading with more realistic contrasts and there is a distinct use of background music, which is still something I can incorporate since Black Mirror is technically a thriller, and features a chase scene.